


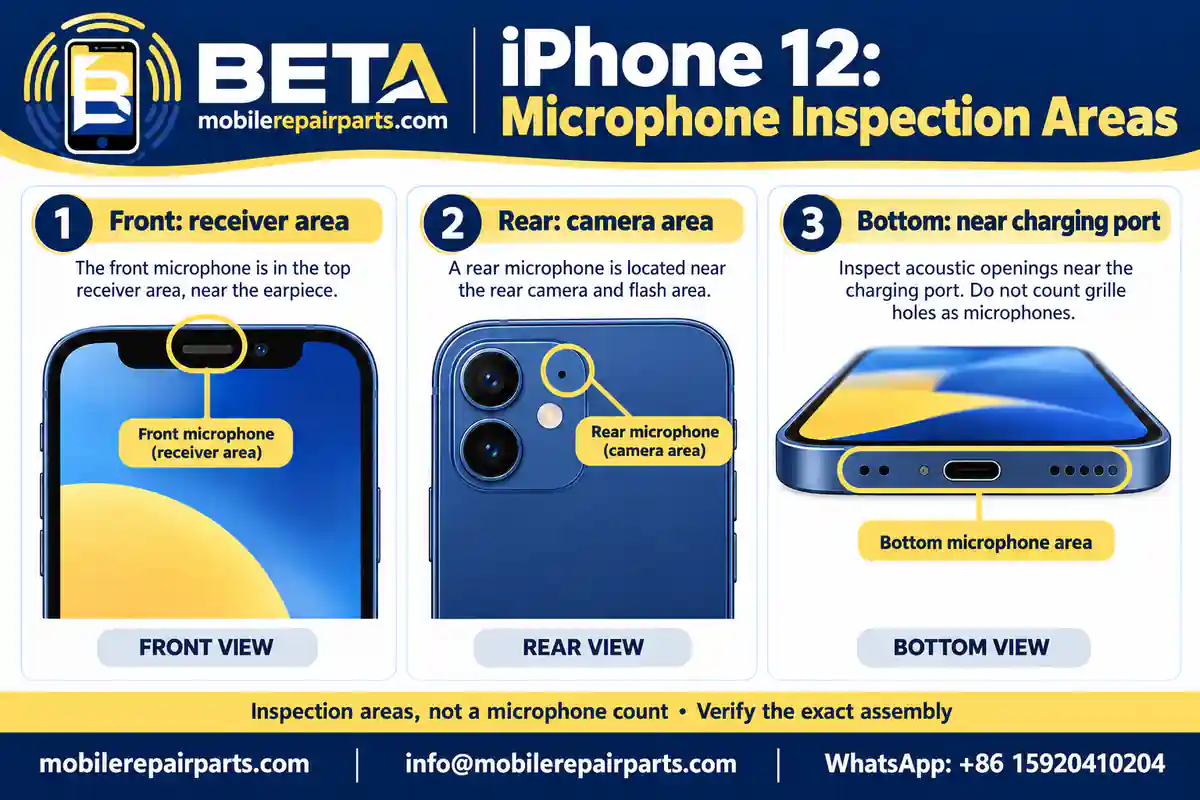
On the iPhone 12, microphone pickup areas are around the bottom edge beside the Lightning connector, the front receiver opening, and the rear camera area. Check these areas first when a caller cannot hear you or a recording sounds muffled. For a repair shop, locating the opening is only the first step: identifying the failed audio path helps prevent ordering the wrong assembly. This guide complements our iPhone spare parts wholesale guide with model checks, audio tests, and purchasing decisions.
📘 Summary
Locate the microphone area, test the affected recording or call function, and confirm the exact model before choosing a replacement assembly.
🔍 Key Highlights
- iPhone 12: inspect the bottom charging-port area, front receiver opening, and rear camera area.
- Do not count visible grille holes as microphones or assume that every iPhone has three microphones.
- Compare Voice Memos, front-camera video, rear-camera video, and a call before opening the device.
- Similar microphone locations do not make flex cables or assemblies interchangeable.
- For wholesale orders, record the model, assembly specification, batch, and audio-test results separately from the company SKU.
Originally published: February 23, 2025. Last updated: October 5, 2026.
Table of Contents
Where Is the Microphone on iPhone 12?
For the standard iPhone 12, start at three inspection zones: the lower edge near the charging port, the receiver opening at the top of the display, and the area around the rear cameras. An external opening, a microphone capsule, and a replaceable assembly are different things. A blocked acoustic opening can produce poor sound even when the internal component is intact.
Bottom Microphone Area
Look along the lower edge beside the Lightning connector. Apple’s iPhone 12 internal view labels bottom microphones separately from the speaker and dock flex. Do not assume every lower grille opening is a microphone, or order a charging flex merely because the sound problem seems to come from the bottom.
Front Microphone Area
Inspect the receiver opening at the top of the front display for a case, screen protector, or debris obstructing the acoustic path. The receiver speaker plays sound; the microphone captures it. A complaint that “the other person cannot hear me” needs a microphone test, while “I cannot hear the caller” also requires a speaker check.
Rear Microphone Area
Check the acoustic opening around the rear camera area without inserting a pin or tool into it. Record a rear-camera video and compare its playback with a front-camera video. A difference is a useful symptom to document, but it does not by itself prove that a particular capsule must be replaced.
iPhone Microphone Locations by Model
The table below is a starting point for inspection and service planning, not a universal fitment chart. It distinguishes standard models from Pro variants where their service arrangements differ. Follow the exact model’s diagram before disassembly; a Mini, Plus, Pro, or Pro Max suffix can change the required part.
| Model | Inspection starting point | Model-specific check |
|---|---|---|
| iPhone 11 | Lower edge near Lightning; check front and rear audio separately. | Do not apply an iPhone 12 assembly specification. Confirm the original part and model. |
| iPhone 12 | Bottom openings near Lightning, front receiver area, rear camera area. | The internal view explicitly identifies bottom microphones. Standard, Mini, Pro and Pro Max require their own parts. |
| iPhone 13 | Bottom charging-port area; front receiver and rear audio paths. | Use the iPhone 13 internal diagram; do not transfer the iPhone 12 flex layout. |
| iPhone 14 | Bottom, front receiver and rear-camera inspection zones. | Standard and Plus service arrangements differ from Pro variants; verify the assembly. |
| iPhone 15 / 15 Plus | Bottom USB-C area, front and rear acoustic openings. | Apple lists a separate main-microphone procedure. This does not establish compatibility with 15 Pro. |
| iPhone 16 / 16 Plus | Bottom USB-C area; front and rear audio checks. | Use the exact model manual, which lists a main-microphone procedure. |
| iPhone 16 Pro Max | Use its model-specific diagram and audio diagnostics. | Apple specifies four studio-quality microphones; avoid a three-microphone assumption. |
References for model checks: iPhone 13 internal view, iPhone 14 internal view, iPhone 15 repair manual, iPhone 16 repair manual, and iPhone 16 Pro Max technical specifications.
Do All iPhones Have Three Microphones?
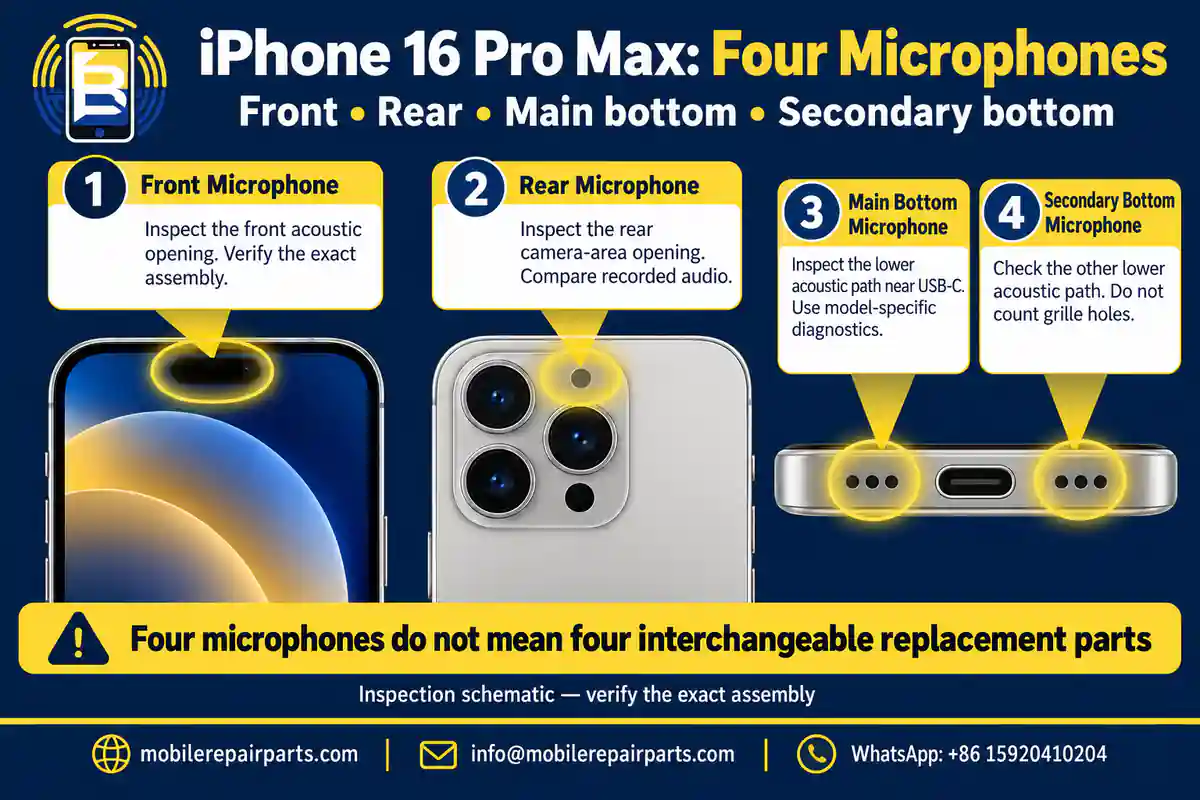
No. The number and arrangement depend on the model. For example, Apple specifies four studio-quality microphones for iPhone 16 Pro Max. Three inspection zones are not the same as three microphone capsules: a zone may contain more than one pickup point, and multiple microphones can contribute to processed audio.
This distinction matters at the parts counter. A supplier listing that says only “iPhone microphone” does not identify the supported device, assembly, connector, or acoustic position. Request those details before placing a bulk order.
iPhone 16 Pro Max Microphones: What Changes for Repairs?
The iPhone 16 Pro Max has four studio-quality microphones, according to its official technical specifications. For a technician, the useful distinction is between microphone roles, acoustic openings, and the assembly required for a confirmed fault. A four-microphone system is not a reason to replace four parts or to treat a USB-C charging assembly as a universal audio repair.
| What is different | What the technician should do | Wholesale implication |
|---|---|---|
| Four-microphone audio system | Document Voice Memo, front video, rear video and call behavior. | Do not use a three-microphone assumption to select stock. |
| Model-specific main-microphone procedure | Use the 16 Pro Max repair manual for access and installation. | Confirm the supplied assembly is for Pro Max, not merely the 16 series. |
| Acoustic alignment matters | Inspect openings and the alignment of the relevant assembly. | Request clear assembly specifications, not only a connector photo. |
| Audio complaint after another repair | Review disturbed parts and repeat the original tests. | Assess installation and part performance before accepting a batch-defect claim. |
Apple’s iPhone 16 Pro Max repair manual lists a dedicated main-microphone procedure alongside display, enclosure, and USB-C connector procedures. Use the confirmed fault and the exact service route to decide which assembly is relevant. The presence of USB-C does not establish microphone-part interchangeability.
When sourcing for this model, compare the iPhone 16 Pro Max microphone listing with the original component, or browse the wider iPhone 16 Pro Max replacement-parts category. Ask which microphone position and assembly the supplied part supports. A listing title is a starting point, not evidence that one part fits every audio fault.
How to Test an iPhone Microphone Before Replacement
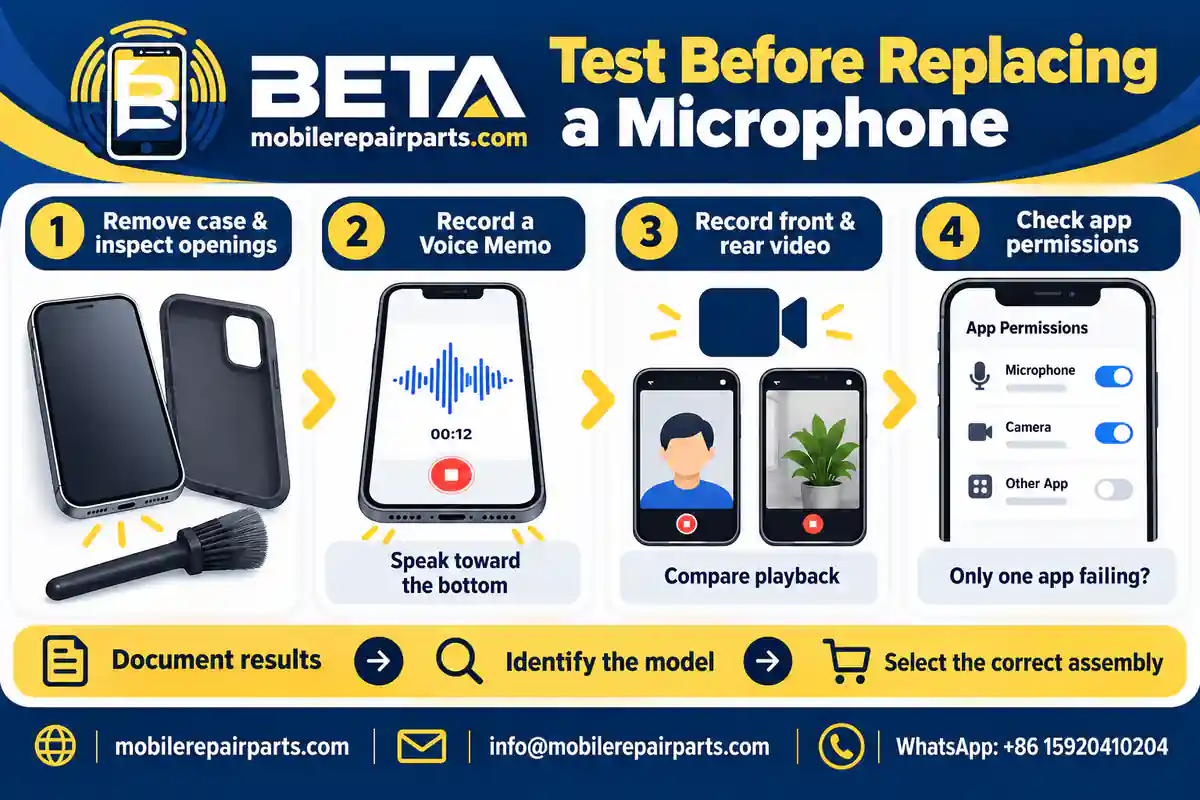
Start with repeatable recordings rather than opening the phone immediately. Use a quiet room, the same spoken sentence, and a similar distance from the device. Save the results so the customer, technician, and supplier can discuss the same fault.
Check Obstructions and App Permissions
Remove the case and any protector covering an opening. If only one app fails, check its microphone access under Settings → Privacy & Security → Microphone. Test again in a built-in recording app. A permissions problem does not justify a hardware order.
Compare Voice Memos and Both Camera Recordings
- Record a Voice Memo while speaking toward the bottom of the phone, then listen to the recording.
- Record a video with the rear camera while speaking toward the top of the phone.
- Switch to the front camera, record the same sentence, and compare playback.
- Make a test call and document whether the problem affects normal calls, speakerphone, or both.
These recording checks follow Apple’s microphone troubleshooting guidance. Treat them as a comparison of audio behavior, not proof that each app uses only one physical microphone.
Use Symptoms to Decide the Next Check
| Observed symptom | Next check | Avoid this premature decision |
|---|---|---|
| Only one app has no audio | Microphone permission and the app itself. | Replacing a flex cable before testing a built-in app. |
| Sound improves after removing the case | Case fit and obstruction of acoustic openings. | Ordering a microphone for a blocked opening. |
| Voice Memo is unclear but videos differ | Repeat the recordings and inspect the lower acoustic path. | Assuming that location alone identifies the failed assembly. |
| Front and rear videos sound different | Document which recording fails; inspect relevant paths and connectors. | Replacing both assemblies without isolating the fault. |
| Problem appeared after another repair | Review disturbed flexes, connector seating, mesh and alignment. | Declaring the newly fitted part defective without inspection. |
| All recordings remain poor | Use model-specific diagnostics and inspect for damage. | Claiming a replacement microphone will certainly resolve it. |
How to Clean Microphone Openings Without Causing Damage
Power off the iPhone and disconnect cables before cleaning. Gently remove loose debris with a clean, dry, soft-bristled, non-metallic brush. Avoid forcing debris into the opening, using compressed air, or getting moisture inside. Apple’s sound troubleshooting instructions describe the cleaning precautions.
Stop if the mesh is damaged or contamination cannot be removed without opening the device. A punctured mesh or displaced seal can create a second fault and make the original complaint harder to diagnose.
Can an iPhone Microphone Be Replaced?
A microphone fault may be repairable, but the replacement unit and service route vary by model and position. Some microphones are part of a larger assembly; others have a dedicated procedure. The supplier’s aftermarket assembly description and the manufacturer’s service procedure should not be treated as interchangeable specifications.
Similar Locations Do Not Mean Interchangeable Parts
Microphone work requires care, but a universal removal procedure cannot cover every model. Confirm connector orientation, flex routing, mounting points, acoustic alignment, and the exact device before fitting a component. Use our iPhone parts compatibility matrix to organize these checks before ordering. A similar-looking part can still leave the phone with poor audio or another failed function.
Keep Replacement Steps Separate from Location Checks
For a repair workflow, continue to our iPhone microphone replacement guide, then check the model-specific repair manual. Use the manual’s battery precautions, opening sequence, and assembly instructions rather than a generic “remove the microphone” step.
After reassembly, repeat the recordings and calls used during intake. Check any nearby functions disturbed by the repair, including charging or front sensors where relevant. Keep before-and-after results with the job record.
Wholesale Buying Checklist for iPhone Microphone Assemblies
A repair shop needs a working audio path, not simply a part with “microphone” in its name. For distributors serving Honduras, Chile, Colombia, Ecuador, and other markets, clear specifications also help staff resolve compatibility questions before stock is shipped. Country alone does not determine fitment.
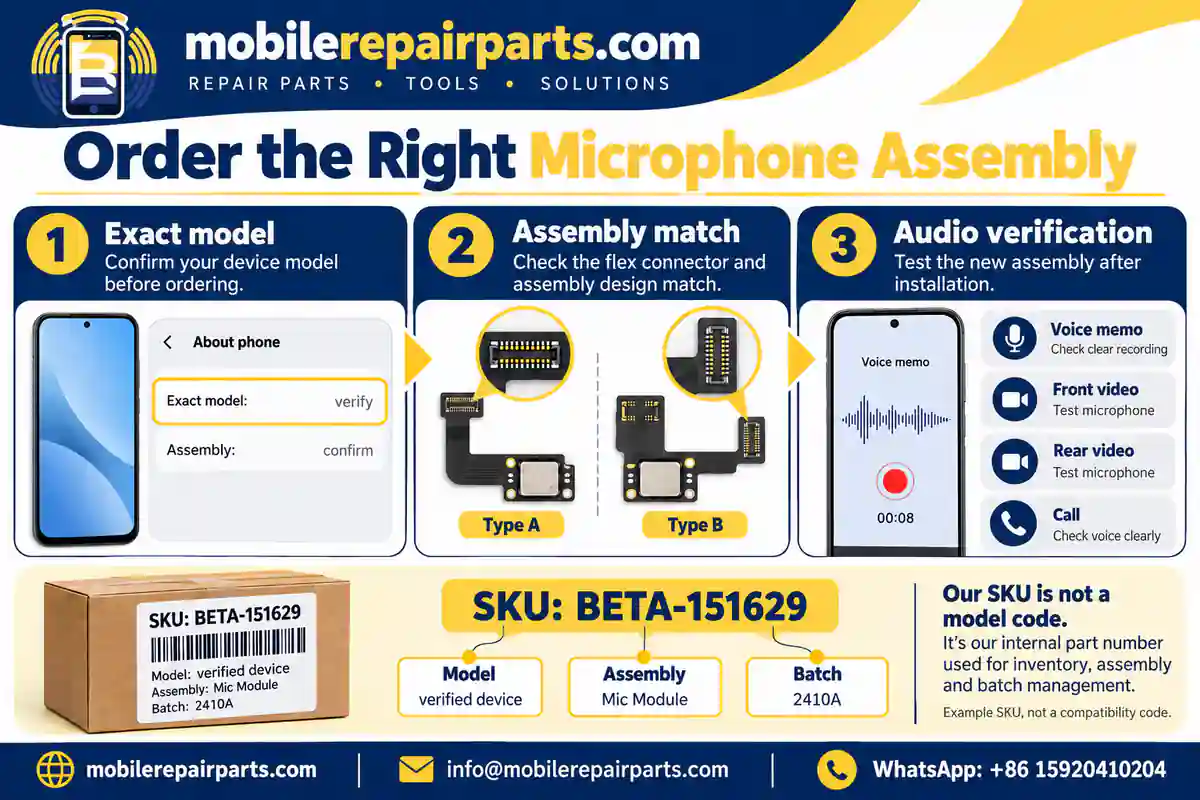
| Purchase detail | What to request | Problem it helps prevent |
|---|---|---|
| Exact model | Full device name and model identification. | Mixing standard, Mini, Plus, Pro and Pro Max stock. |
| Assembly supplied | What the part includes and which microphone position it supports. | Buying a port, flex or housing assembly for the wrong audio fault. |
| Physical match | Connector orientation, flex routing, mounting and acoustic alignment. | Installation mismatch or a blocked acoustic path. |
| Test evidence | Which functions were tested, on which model and sample. | Treating a vague “tested” label as complete verification. |
| Batch and packing | Batch reference and protection for flexes and connectors. | Untraceable returns or shipping damage. |
| Warranty conditions | Documented acceptance and claim requirements. | Disputes over installation damage and unverified failure. |
Use the BETA SKU as a Product Identifier
BETA uses a company prefix followed by its product number, for example SKU: BETA-151629. This is an example of the naming format, not confirmation of a microphone product or its availability. Store the supported model, assembly type, batch, and test status in separate fields; do not infer them from the SKU.
Make a Specific Wholesale Enquiry
Include the exact model, the failed recording or call test, a photo of the original assembly where available, the required quantity, and your destination country. Use our contact page to request confirmation of the appropriate part, current availability, and terms. A complete enquiry is easier to assess than “I need an iPhone microphone.”
Frequently Asked Questions
Where is the microphone on iPhone 12?
Inspect the bottom edge near the Lightning connector, the front receiver opening and the rear camera area. These are inspection zones, not a total microphone count. Match the exact model before choosing an assembly.
Are iPhone 11 and iPhone 12 microphones interchangeable?
Do not assume so. Similar external locations do not confirm matching connectors, flex routing or assemblies. Verify the exact device and replacement specification.
Does every iPhone have three microphones?
No. The arrangement varies by model. Apple specifies four studio-quality microphones for iPhone 16 Pro Max, so a universal three-microphone claim is incorrect.
How many microphones does iPhone 16 Pro Max have?
Apple specifies four studio-quality microphones. Identify the affected audio path and consult the 16 Pro Max service procedure before choosing a replacement assembly.
How can I check the microphone before buying a replacement?
Inspect for obstruction, compare a Voice Memo with front- and rear-camera recordings, check a call, and review app permissions if only one app fails. Document the results before selecting a part.
Does a microphone problem always require a charging flex?
No. The affected audio path and microphone assembly vary by model. First identify the fault, then confirm what the proposed replacement includes.
What should a wholesaler record for a microphone assembly?
Record the exact model, assembly specification, physical match, batch and test evidence. Keep these separate from the company SKU and communicate warranty conditions clearly.
Find the Opening, Then Confirm the Repair
Begin with the microphone location the reader needs, but make the parts decision from evidence. Inspect the openings, compare recordings, confirm the model, and match the assembly. That sequence gives technicians a clearer diagnosis and wholesalers a more useful order specification.